Page 1 of 2
Bens Dexta - 3 - -Engine Rebuild
Posted: Fri Jan 23, 2009 12:46 am
by Bensdexta
Removed my engine:

Taken my engine to North Wales Engines at Colwyn Bay, who say it's not a pretty sight having stood for 10+years full of water:


Any comments appreciated!
Ben
Posted: Fri Jan 23, 2009 7:52 am
by Chris Ivin
Hi Ben,
Good to see you're getting stuck in! The pistons will be a devil to shift, I had to press one of mine out in a press, the liner nearly came with it!.
I assume that North Wales Engines are stripping down and doing a full rebuild?
The coolant channels in the block and head look very choked with limescale. It would be advisable to get as much of that shifted as possible before the rebuild as it will affect the cooling efficiency of the rebuilt engine. My block wasn't too bad having come from a hard water area and I just had to flush it out. If you look back through the old posts I think there are posts dealing with shifting limescale through soaking in some type of acid (can't remember what acid at the moment).
Good luck with the project.
Engine Rebuild
Posted: Fri Jan 23, 2009 10:01 am
by Bensdexta
Chris,
Yes N Wales Engines recommended to me by BarryT, are doing a full rebuild. I asked them to check the oil pump too as they don't usually do that.
How long does an oil pump last? Mine may have been in water too.
Any other suggestions appreciated?
All the best,
Ben
Posted: Fri Jan 23, 2009 10:16 am
by Brian
Now Ben, you disappoint me!

The best bit of any tractor restoration is getting the engine, gearbox and hydraulics working!
There is nothing like the buzz you get when you first fire up an engine that you have had stripped down to all its component parts. Having done hundreds of diffrerent ones, I still get a massive kick when the smoke pours out of the exhaust and she roars away.
Getting someone else to do it is just not the same.
Posted: Fri Jan 23, 2009 10:48 am
by Grani
Brian wrote:There is nothing like the buzz you get when you first fire up an engine that you have had stripped down to all its component parts. Having done hundreds of diffrerent ones, I still get a massive kick when the smoke pours out of the exhaust and she roars away.
Getting someone else to do it is just not the same.
You definitely made the right choise back then, when You decided to become a tractor repairman if You still get the same kick after all those engines.

Posted: Fri Jan 23, 2009 10:56 am
by Bensdexta
Brian wrote:Now Ben, you disappoint me!
The best bit of any tractor restoration is getting the engine, gearbox and hydraulics working!
There is nothing like the buzz you get when you first fire up an engine that you have had stripped down to all its component parts. Having done hundreds of diffrerent ones, I still get a massive kick when the smoke pours out of the exhaust and she roars away.
Getting someone else to do it is just not the same.
Brian,
You're right, but I'll still get a massive kick
Unfortunately I just don't have the time, workshop or skills to do it myself and there's fields covered in molehills come anthills to harrow!
All the best,
Ben
Posted: Fri Jan 23, 2009 12:47 pm
by Brian
Grani,
You are so right! Many years ago I decided I wanted more job satisfaction and the service work was not giving it. I wanted a "clean hands" job.
I had an interest in a small company that made dental alloy for filling teeth and I left the dealership to become a director in charge of the manufacture of the various alloys. I was involved in the smelting of the silver, copper, zinc, and tin, then cutting and grinding and afterwards roller milling and testing to a British Standard in the laboratory. We worked to microns as far as expansions in the material was concerned. Too little expansion and the filling would fall out, too great an expansion and the filling would shatter the remains of the tooth. Very interesting and rewarding work.
I was really happy, the business was in a rural location, surrounded by farm land and in large grounds that we mowed with ride on mowers when we wanted a break. One day in August, a combine started up in the neighboring field and the dust blew across the lawns. From that moment I knew I was in the wrong occupation and I started looking for ways to get back into agricultural machinery.
The rest is history!

Posted: Fri Jan 23, 2009 1:38 pm
by Grani
When I was in the army I become an assistent of the dentist just to have an off field duty. It was not in my interest at any time to continue with a real job of that kind. So i have been mixing a fev fillings too.
Posted: Fri Jan 23, 2009 4:05 pm
by crofter
Ben, you are best to Fit a new oil pump, thay are not expensive when you think of the cost of the rest of the engine, and are readily avalable, the oil pump is the Heart of the engine, should anything go wrong with it all your hard work and money will be wasted.
Regards,
Ronnie.
Posted: Fri Jan 23, 2009 4:44 pm
by Grani
crofter wrote:Ben, you are best to Fit a new oil pump, thay are not expensive when you think of the cost of the rest of the engine, and are readily avalable, the oil pump is the Heart of the engine, should anything go wrong with it all your hard work and money will be wasted.
Regards,
Ronnie.
All the new oilpumps are not as good as they should be. I bought one to my Trader engine and when i measured the clearence between the gear and body the new pump has the double compared to my old, and the gear theets was chamfered on both sides. My opinion about the new pump was that it was just scrap. So be careful.
Posted: Fri Jan 23, 2009 5:41 pm
by Brian
The new oil pump that is supplied will need modification as it is the one used in the Ferguson version of the engine.
Posted: Fri Jan 23, 2009 7:09 pm
by Chris Ivin
Hi Ben,
The early engines also have a different design of crankshaft thrust washer with the locating tab in a different position. The later engines use the same thrust washer as on the Ferguson version of engine.
I had problems finding the oversize versions of the early design thrust washers and ended up refitting my original washers that were still just within tolerance.
As Brian mentioned the plumbing to the oil pump is different for the later design oil pumps so you will probably find that you(or North Wales Engines) will need to change the pipework to the oil pump.
Oil Pumps
Posted: Sat Jan 24, 2009 7:32 pm
by Bensdexta
Thanks for the info on oil pumps.
When you say 'old' and 'new' pumps, when was the change date?
My tractor was built in Nov 1961 so I assume the engine was about then also. Is it 'old' or 'new'?
I have just found this post on assessing the condition of the oil pump (for the Super D engine?):
http://vintagetractorengineer.com/2009/ ... er-3a-152/
Also oil pump inspection is covered in the Dexta Workshop Manual, see Stefan's site.
Any comments appreciated,
Ben
Posted: Sun Jan 25, 2009 2:48 pm
by Chris Ivin
You should be OK if it is 1961. I think they changed when the 3 cylinder Perkins engine was introduced to the 35 in 1959.
My Dexta is June 1960 and had the later design while the engine I reconditioned to replace my old engine was 1958 and had the old type oil pump and thrust washers etc.
Dexta Oil Pump
Posted: Sun Jan 25, 2009 3:11 pm
by Bensdexta
Chris Ivin wrote:You should be OK if it is 1961. I think they changed when the 3 cylinder Perkins engine was introduced to the 35 in 1959.
My Dexta is June 1960 and had the later design while the engine I reconditioned to replace my old engine was 1958 and had the old type oil pump and thrust washers etc.
Chris,
That's good. Stefan tells me he fitted a Sparex 5934 pump to his Dexta:
http://www2.gb.sparex.com/Sparex.aspx?P ... 34&dummy=0
All the best,
Ben
Clutch Housing
Posted: Wed Feb 04, 2009 1:36 pm
by Bensdexta
Hi,
Below is a pic of my Clutch Housing:

A couple of Questions:
1. The 'clutch release' bearing (is that the correct name, or thrust bearing?) appears to be scoured. Should I replace it? Will this normally come as part of the clutch kit, as I'm fitting a new clutch?
2. As you can see there is oil spread around the housing. Where do you suppose it has come from and what should I do about it?
The shaft turns freely and smoothly and the clutch pedal works.
Thanks for your help,
Ben
Posted: Wed Feb 04, 2009 4:04 pm
by commander
Ben, you should definitely replace that thrust bearing, and the (smaller) pilot bearing that fits up in the other side of the clutch assy. They are sealed bearings and the grease dries up in them over time. They are not normally included when you buy a clutch, you have to purchase seperately. If your supplier happens to include them in the package, they should be listed.
If you'll look in the parts book you'll see an oil seal on the transmission shaft just behind the clutch release support assy... pn# e81-gd-9...it's a likely source of the oil in the housing. I would also replace the support bearing on that end of the shaft if it has any play in it ...pn n-115069-a ..if the shaft is wobbling about, it will quickly wear out a new seal.
(double check those part numbers....I'm looking at an old parts book...and there are some differences with or without live pto )
Remove the clutch release support to access the seal and bearing. The bolts should be safety wired. (be sure to replace the safety wire when you reassemble). The seal and bearing are held in place by some 'snap ring' retainers. There is also a gasket behind the support assy.
The other likely source of the oil in the housing would be the rear main seal on the engine...it will get replaced as part of the engine rebuild.
Posted: Wed Feb 04, 2009 11:43 pm
by Bensdexta
Jack,
Many thanks for your most helpful post.
I've checked the part numbers you mention for the single 11" clutch and they agree with the parts list downloaded from Stefan's web site
http://www.fordson-dexta.de/downloads/dextaetxl.pdf .
Some of these part nos have been superseded as can be seen on the
http://vugot.com/ website (click on the Dexta link) which gives a very useful interactive parts listing for the Dexta and which links with the New Holland-Europe database. I phoned Vugot who checked that the later NH pns supersede the pns you mentioned. Apparently NH and Case pns are being combined so they may change again!
Following your advice and that of the engine shop who have just rebuilt my engine, I am getting a full clutch kit which includes the parts you mention.
Many thanks again,
Ben
Clutch replacement
Posted: Sun Feb 08, 2009 9:22 pm
by Bensdexta
Following my earlier post and Commander's reply above, I am about to order my new "single" clutch kit.
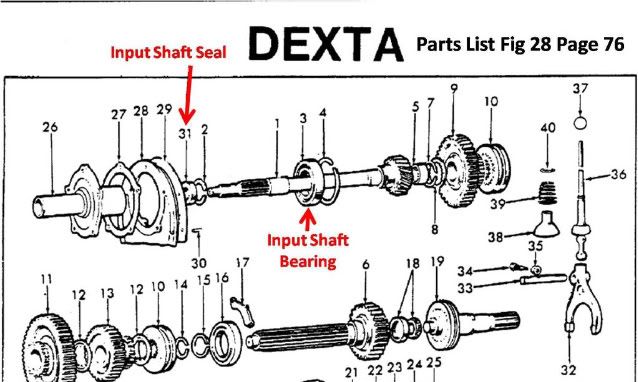
I will order a new pilot bearing (fits in the flywheel) and what suppliers seem to call the "Input Shaft Seal", which I assume is pn# e81-gd-9 (see Commander's post) and labelled in the diag below, copied from the parts list on Stefan's site.
Commander also mentions "the support bearing on that end of the shaft if it has any play in it ...pn n-115069-a", which I have labelled Input Shaft Bearing below:
Please can someone confirm that both Seal and Bearing (if required) can be changed easily by removing the clutch release (aka thrust?) bearing assy in the Clutch Housing? IE both seal & bearing are accessible from the Clutch Housing and there is no need to get inside the Front Transmission Interior? Are any special tools req'd to change seal & bearing?
Many thanks,
Ben
Posted: Mon Feb 09, 2009 5:12 am
by commander
Ben I changed that seal and bearing when I went through my Dexta. I did not disassemble or remove the transmission....I did have the gear levers and cover plate off cleaning them up. I may have reached in through that opening to aid in removing the bearing. I honestly don't remember. I had no special tools, ie nothing purchased from ford/case/new holland......just common hand tools ....
maybe somebody else with a better memory

can chime in.
Posted: Mon Feb 09, 2009 8:02 am
by Bensdexta
Jack, Many thanks for the clarification, Ben
Posted: Wed Feb 25, 2009 11:54 am
by Bensdexta
Some more pics of my engine before rebuild:
Block.
The Engine Shop say there's no frost damage. 10yrs ago I drained the radiator but not the block - v lucky I think!!

Front

Rear

Flywheel

I have ordered a new clutch plate, pressure plate, pilot bearing, thrust bearing and transmission input shaft seal (lives behind the thrust bearing)
QUESTION:
Should I have the flywheel skimmed?
Your advice is appreciated,
Thanks,
Ben
Electrolytic Rust Removal
Posted: Sun Mar 22, 2009 1:49 pm
by Bensdexta
I've been experimenting with electrolytic rust removal on my Water Outlet & Thermostat Housing, following Mike Kuscher's method - see old website. Pic below:

I'm using an ordinary car battery charger and washing soda solution. The negative black terminal is connected to the water housing and the positive red terminal to a 6" nail which serves as the anode. The nail protrudes into the housing to derust the inside, BUT MUST NOT TOUCH IT!
I've partially drained the solution to show the housing better, after about 48hrs with about 0.2Amps. Note the 'crud' that accumulates around the anode.
During the process, the object turns black as much of the red rust is converted to Fe3O4, black rust or Magnetite. This is inert and can be left or the object can be scrubbed clean to leave shiny metal.
Electrolytic Rust Removal
Posted: Sun Aug 30, 2009 10:54 pm
by Bensdexta
A pic of my derusted thermostat housing. Not perfect but alot cleaner than it was.

I've been doing quite a bit of electrolytic rust removal, mainly on smaller panels, air filter housing etc. It works well. It leaves the object with a black magnetite finish (also known as 'black rust'). This can be left on the object or scrubbed and removed with a rust remover - I have been using Bilt-Hamber DeoxC, to give a shiny bare metal surface which should be primed with a suitable primer straight away.
I have been using a low current less than 0.5 Amps which I read is gentler on the object being derusted and encourages a degree of electrolytic iron deposit. Preferably the electrolyte should not be overly disturbed during the process, and should remain clear. To achieve this with a 12V car battery charger, I placed a number of car light bulbs in series with the object being derusted.
One point - don't use a stainless steel anode as this produces hazardous chromium compounds. Work safety, 12V DC can be hazardous. A helpful link here:
http://myweb.tiscali.co.uk/andyspatch/rust.htm
All the best,
Ben
Engine Cleaning and Painting
Posted: Sun Aug 30, 2009 11:54 pm
by Bensdexta
North Wales Engines, Conway, went through my engine. Replaced liners, pistons, rings, shells, reground crankshaft, did the head, new valve guides, etc. Said the original oil pump is still OK. The proprietor says he's rebuild 500 Dexta engines in the last 40 years, so should know his engines.
After my engine was rebuilt, I got it cleaned and painted by Cleaning Consultants of Billingshurst West Sussex, who specialise in cleaning car bodies, engines, old artefacts including cannons, statues for Royal palaces, parts of a Merlin engine for a Spitfire to mention a few. And the Managing Director recently cleaned/painted his own old artefact - a '62 Dexta
My engine taped-up, 'blanked-up', string wound around the shafts to seal them, ready for cleaning, first with beads to remove paint and then grit at a low-pressure to remove any corrosion:

After cleaning

First primer - Zinc Phosphate;

Second primer - Yellow Etch Primer, 2 pack, with an acid content, often used on auminium, not essential, but 'belt and braces';

New Holland grey primer

New Holland Empire Blue

So far so good. It's now in the shed awaiting the rest of the tractor to catch up.
All the best,
Ben